|
Create clear and consistent procedures that communicate classroom expectations to students.

The list of a typical teacher’s responsibilities is long — in addition to curricular work, lesson planning and implementation, monitoring and assessing students’ learning, offering feedback to students, parent communication, and so much more, teachers are also responsible for making sure that all aspects of learning and the classroom are organized and safe. The work can feel endless.
It is a hefty responsibility to plan for and implement procedures for all transitions or movements in and out and around the classroom. However, once you have developed and implemented some simple, clear, and consistent procedures, the work can feel less daunting and move more smoothly!
Locating routines
The initial notion of the Three Rs — Reading, (w)Riting and ‘Rithmetic — as the foundation of learning and education is clearly too narrow, especially as we move more firmly into the 21st century. Instead, reinterpreting the Three Rs as Routines, Rituals, and Relationships makes more sense as guiding principles for today’s classrooms. First, let’s take a closer look at how routines, rituals, and relationships help us make key decisions as we cultivate our classrooms. Rituals are different from systems and procedures, because their main goal is to create and sustain community and support an inclusive culture where all students feel welcome, safe and appreciated. Rituals may be instilled as you start up the year, and they will also develop authentically as you get to know your students. Relationships include the development of connections between teacher and student, and also amongst students and their families. This includes developing and maintaining relationships with students, restoring relationships when conflicts or tensions arise, and sustaining positive communication. Routines are often where we begin, as they are a crucial starting point to creating the classroom culture. They may be defined as systems for managing the complexities of a classroom space and any procedures for making the class run smoothly. I like to think of classroom management not as managing students, but rather as managing the space, whether it is digital, hybrid, or in person.
Setting up the space
Before we establish classroom routines, we need to set up the physical space and make choices about how best to use it. The way we set up our classrooms creates not only organized and smooth classroom operations, but lays the groundwork for a welcoming environment for all our students. Many factors determine the set up of the classroom, including how much space is actually available! Remember to be flexible and adapt your classroom setup — including your students’ seating — based on how your students work best together, your instructional goals, and your students’ evolving needs. Considerations & examples
Shaping seating charts
Just as important as how the basics of your classroom space will function is where your students will sit. Some of us may be ambivalent about using seating charts, as they might conjure up old-fashioned, controlling images of classrooms and teaching. Some teachers, on the other hand, swear by a seating chart in their classrooms. I encourage all teachers to start with a seating chart, even if it is simply alphabetical, so that you can get to know your students and also observe their interactions and dynamics. Then, after you’ve gotten to know the class better, you can make adjustments as needed. These adjustments can stem from observations about student behavior, but also from your instructional goals, as mentioned above. Ashlynn Wittchow reminds us to “let the space work with you, not against you,” and she encourages teachers to let students know that the seating and layout will change over time. Imagine Schools also offers some inspired ways to maximize classroom space while remaining flexible and student-centered. Considerations & examples
Shifting to routines
During my time as a teacher, I learned pretty quickly that not only setting up routines, but discussing and practicing them with my students, was key to making them meaningful for my classroom. Once my space was set up, I needed to consider how students would enter and exit the classroom, how we would handle the distribution or collection of materials, and even how students would re-enter class after being absent. Each of these pieces have an influence on students’ understanding of the roles and expectations within a classroom, which in turn, can impact their learning experience. Below are some typical categories for classroom routines, as well as some factors to consider as you make decisions, and examples of what these routines can look like in practice. Entering the classroom
Starting class
Distributing & collecting materials
Engaging in digital learning
Evaluating additional procedures
Ideally, we establish classroom routines at the beginning of the year, during a period in which both we and our students are engaging in a fresh start. However, it is never too late to re-evaluate or re-establish routines with your students, if you discover gaps in classroom management or that your students have outgrown existing structures.
Small moves that will help you hold on to that fresh teacher start a bit longer.

We have all seen memes of teachers beginning the school year versus teachers finishing the school year. The September teacher is energetic, cleancut and almost joyful; the June teacher looks disheveled and desperate. Think Michael from The Office on his best day compared with “Prison Mike.” It’s a funny meme, and relatable perhaps for our students, too.
But the truth is I never really feel that organized and ready for September. While I know I will never be that Pinterest teacher who has everything just so, if I spend a bit of time early in the school year planning, I can create the type of positive and organized learning environment that leads to a successful learning partnership.
Start with community building
This is a non-negotiable. I can imagine you are reading this and rolling your eyes. And frankly, I’m with you. There is nothing more irritating than community building when nobody is into it and the task feels superfluous. But hear me out: in order to have those discussions where students feel safe enough to explore and share their thinking, or feel comfortable enough to ask a question, we have to find a way to help students get to know one another. And we have to start somewhere, even if it's with just a few ice breakers that can be tweaked to fit your needs and the ages of your students. It may feel silly, but explain to your students that in order to do the hard work throughout the year, they need to know who is in the room with them, who their classmates are. Another way to think about this to help your students develop their emotional literacy within your classroom. Teaching students to talk to each other in honest and respectful ways is an ongoing and complex goal, but starting with some type of community building is the way to go.
Create or systematize the days of the week
As much as you can, of course. For instance, perhaps every Friday is a discussion day or a day to read and discuss current events, with the ask that your students connect it to your curricula. Perhaps every Tuesday and Friday are homework collections days, so students know what to expect and you can plan accordingly. You can make changes as the year progresses, but begin the year with a system to make your life and your students’ lives more predictable. My colleague Ashlynn Wittchow refers to this concept as making a plan for material management.
Plan broadly
Sketch out the year with the end of marking periods in mind so you have a strong sense of the perimeters of your curriculum. Look at weeks where there are no breaks and consider planning a field trip or asking a speaker to visit during those long stretches. The more you can sketch out your year and plan specific events in your classroom, the less anxious you’ll feel. I say this as a compulsive list maker, and Harvard Business Review will back me up on this. Again, your schedule or plans may change, but you can start plotting different elements of the year as a way to frame your backward planning.
The beginning of the school year can be overwhelming — new procedures and mandates, the mental and physical preparation of getting your room ready — and there are always new people to learn how to work with and get to know. But there is so much possibility at the beginning of the school year, which acts as a clean slate for teachers and students. Starting the year by building community, creating systems and structures, and determining a few key dates in the timeline are small moves that will help you hold on to that fresh teacher start a bit longer.
Subtle ways to help redirect your students.

I recently met with a colleague who had just returned from visiting a science teacher’s classroom, and when I asked her about her visit, she replied, “I love being in his classroom. I mean, he’s such a natural teacher.” I nodded, because I know just what she means. In this particular teacher’s classroom, the students produce thoughtful work and always seem engaged, even cheerful, which is no small feat for high schoolers. He has a gentle, relaxed way about him and when students start to act a little silly or get off task, he swiftly ushers them to their seat or nudges them to refocus.
I kept thinking about that phrase “he’s such a natural,” and what it means to be a “natural” at teaching. Or anything, really. I thought about the teachers I’ve worked with whom I consider to be “naturals,” and how they seem to teach effortlessly, how they bring humor into the classroom and make students feel safe and welcome so they can focus on learning and engaging with the content. Professor and mentor Ruth Vinz always pushes educators to name the verbs we use in teaching. In other words, what does it mean to “teach?” In this case, what are those moves this “natural” teacher makes to keep his class running smoothly, so class time is spent on learning?
Non-confrontational strategies
Our classroom management resource can help you encourage students in your class who may need some redirecting, and proactively stop flare-ups before they start. The goal is to maximize class time with your students, and this resource may provide fresh ideas. As you look at the list, notice which strategies you are already doing and which you can try. Below are some non-confrontational strategies from this resource that I use all the time. Please note: if anyone in class is in danger of hurting themselves or others, the teacher needs to reach out for help immediately.
Acknowledgement
To the class aloud, “I want to say thank you to x, y and z for working quietly on their assignment.” Or “Everyone is working so well, keep up the good work!” This strategy notices and names students who are on task, or working towards the right direction. Naming students who are doing the “right thing” is a great teacher trick, as it allows students to hear their name in a positive way. This acknowledgement can even sound like, “I love how you are partnering together and sharing your ideas,” as this feedback names the specific ways students are working in your class. When teachers use positive narration, they are creating a positive cycle that other students will want to engage in.
Proximity
Teacher stands close to students who are talking or disruptive. The teacher continues to stand there until the students have stopped their disruptions. This is such a classic teacher move that so many of us practice without even knowing it! When a student begins to get a bit distracted, walking over to the student and standing near their seat is often enough of a gesture to refocus the distracted student, instead of elevating the situation by saying their name in a disciplinary way. Along this same trajectory, it often helps to walk farther away from students who are speaking too softly for classmates to hear. Students tend to speak loud enough for their teacher to hear, but if the teacher is moving to the far side of the classroom, they will have to raise their voice to become more understandable. This is another non-confrontational way of nudging students to project their voices instead of asking students to “speak louder.”
Waiting
Teacher is speaking to the class when talking begins. The teacher freezes mid-sentence — doesn’t speak or move — and doesn’t speak again until the room is quiet. We can all remember that teacher who could silence a class with just a look. Perhaps by widening their eyes, or a slight tilt of their head. Before you knew it, students were shushing each other and sitting up a bit straighter. While there may be a touch of teacher magic happening in these scenarios, the “Wait” strategy is an effective way to redirect your class without raising your voice! Sometimes it takes a minute for students to get quiet. This strategy is a reminder that teachers don’t have to talk louder or speak over students; on the contrary, it is more powerful to pause and wait for class to quiet down. It’s also a good reminder that sometimes silence or “wait time” in the classroom is necessary — particularly during discussions or after the teacher or a student poses a question.
There are some teachers who may appear as “naturals” in the classroom, but if you start to notice and name their teaching moves, you will find that they are practicing non-confrontational strategies with their students. These small moves are ones that all of us can employ, and with some consistency and a bit of teacher swagger, perhaps we can all be “naturals” as well.
Seamlessly navigate the pacing of your lessons.

When I was in college, I waitressed at a French bistro on the Upper West side of Manhattan. During my first couple of shifts, I made all of the quintessential mistakes — forgetting to put in orders, getting orders wrong, not being able to greet all of my tables, not knowing if and when to ask for their order or when to drop the check. I found myself overwhelmed! Over time, however, I learned that to be a really good waitress is a skill, an art, something that you can improve. As one of my favorite managers once told me: you’ll know you’re a good waitress when your patrons don’t even know you’re there, when you seamlessly navigate the pacing of their food and drinks.
It’s all about the pacing!
Foundations of timing
In my time as an educator, I have leaned on many of my waitressing experiences. Like waitressing, teaching is an art, and so much depends on successful pacing! How you pace your lessons, the order and flow of your instruction, how much time you dedicate to each task, and how you transition to each segment of a lesson are challenging yet crucial pieces of being a teacher. These actions have such important implications for student learning. How can you tighten up your lessons? Get started with our Foundations of Timing Instruction resource, which highlights helpful considerations and rules of thumb for timing and transitioning your instruction, including:
Whether you are just starting out, or are a seasoned teacher, your pacing can always be improved so that you are better able to serve your students.
Productively engaging students is a real challenge — but the solution may not be too far out of reach.

How can we create a classroom situation where all our students are productively engaged?
Engaging a class of students in a lesson can feel like a daunting task, with constant disruptions and more students off-task than on-task. It can be overwhelming! Setting up predictable routines and rituals for our students is key, and staying in touch with each of our students to help them engage with a meaningful task is a crucial element of creating a productive, positive work environment. The challenge is real — but the solution may not be too far out of reach. Our Three Sweeps resource (download here) provides a practical approach to getting all students on track and working.
The First Sweep
First, start students on an independent task like a warm up or “do now” prompt. The most effective opening activities are tasks that engage students in the topic or theme of the lesson using prior knowledge. As students enter the class, we can point them to the prompt and activate our first “sweep” by circulating through the entire class and “touching base” with each student using a light touch and offering an affirmation or posing a question, such as: Affirmations
Questions
This first sweep is designed to acknowledge the students who are cooperative and on task (early adopters) and offer those who are not yet settled a calming and supportive first “touch.” Let’s be real: students enter the classroom space in all different mindsets. We want to quickly and quietly acknowledge all of the students who are ready to work, and also have a personal and positive first contact with those who need more support to transition into their classwork. The first sweep communicates the expectation that you are recognizing each student in a supportive way, and it necessitates a personal exchange with each student. After we’ve made contact with each student and either affirmed their engagement or redirected them to the task, we begin our second sweep.
The Second Sweep
Our second sweep is a second opportunity to touch base with all students, with a focus on supporting off-task or unsettled students settle into their work. To start Sweep 2, quickly scan of the room and identify students who have not yet begun the activity. Maybe they’re talking or walking around the room, or maybe they’re distracted. Prioritize a second check-in with these students. Now, the contact and questions with students can include slightly more pointed questions to pinpoint what may help each individual student engage in the task at hand. Depending on the specific situation with each student, and the prior exchange, these questions and comments may include:
Students in Sweep 2 will benefit from a next step action:
Often, we lean on negative interventions with students who exhibit off-task behaviors, calling out students’ names in front of the class, asserting the rules or expectations, or publicly demanding a change in action. Unfortunately, these tactics are more likely to antagonize students who are struggling to connect with the work and can escalate tensions and increase students’ insecurities. The second sweep more deeply acknowledges each student’s specific needs and offers them advice or a tool to get to work. It should be done as calmly as possible with the expectation that students will respond productively. As much as this sweep is about positive reinforcements, it’s also about accountability. If a student says there are no barriers to begin their work, then there are no more excuses, either. If there are barriers to beginning, we want to know so we can remove them and work with kids so they can fully access the assignment. Now, it’s time for Sweep 3.
The Third Sweep
In Sweep 3, we return to a touch point for every student in the class. For students who have been working well for the duration, this is the time to check for understanding, affirm their progress, clarify any questions, and identify any obvious misunderstandings in their work so far. For students who are still struggling to engage in the task, we restate our purpose and return to our redirection questions. Restating the purpose is an important moment to communicate a shared expectation and explicitly outline the value of the task, and the community expectations. Affirmations
Clarifications
Restating Purpose
Redirect Questions
Notice that in these questions, we’re really focusing on asking the student to provide the solutions. When students choose to engage, or offer a suggestion for what would help them work better, they are more likely to implement the strategy they suggest, even if it doesn’t seem genuine to us in the moment. This is a key factor, because when we respond defensively to students who may show up distracted or disengaged, we can fall into exchanges that are more about power and control than they are about learning. We want to remember that — especially when we’re striving to develop a culture of high expectations in a positive work environment — it's critical that we find the path to engage all students in meaningful work. That might mean setting aside our personal feelings, and staying laser focused on helping every student to engage in the task.
Making the most of each sweep
Getting used to the three sweeps may take a little time and a little practice, but we’ve found that this is a highly effective strategy throughout the class period. Each sweep ensures that every student has at least two personal interactions with their teacher(s), and that students struggling to engage in the content have at least three positive and proactive exchanges with their teacher(s) — each serving as an opportunity to engage. To maximize the use of Three Sweeps, consider these quick tips:
Three Sweeps can be a shortcut to student engagement and creating a culture of learning. When we get everyone involved and engaged, we can focus on the learning and build momentum towards deepening our students' content knowledge and skills on a daily basis.
Recognize the motivations behind behaviors that block success and explore how to respond appropriately.

A social media post ignites a tiny fire, and the fire blazes as people pour fuel in the form of dislikes and comments accusing one another of being wholly disrespectful to a person, people group, larger community, or an entire country. From social media to the dinner table to the holiday family gathering, we hear words and actions that offend us, and we attribute disrespect or out and out defiance to the person across the table. So much disagreement, so many approaches.
The same goes for our classrooms, right? We’re teaching and a student rolls their eyes or puts their head down – but wait, before we even got to this teaching moment, we spent hours in backwards planning for our unit and prepared an essential lesson to our topic — and now, we’re getting disrespect in return? It’s easy to give up, but what if we approached what we’re seeing in a different way? What if we get curious about what it is we’re noticing in student behavior?
Responding vs. reacting
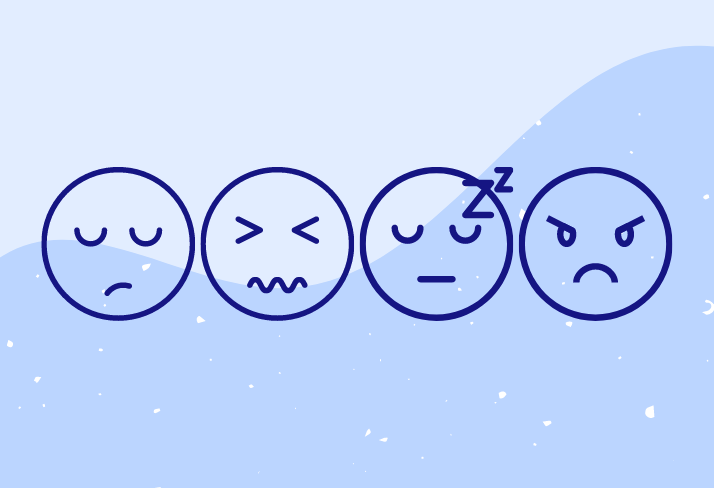
Our resource for tackling off-task behaviors — Behaviors that Block Success — helps us respond rather than react. We consider that there are four types of behavior that have a negative impact on the classroom environment, and it’s important to be able to recognize what each behavior type looks like, as well as the motivations behind it. This is what will allow us to act responsively.
We can use this resource as a tool to interpret student behavior in a constructive way, cultivating curiosity in ourselves. In order to interpret behavior, we must challenge ourselves to see beneath the surface and identify why the behavior is happening. When encountering inappropriate student behavior, our goal is to respectfully communicate the expectations, de-escalate the conflict, and maintain teacher authority. We can review the behaviors, make connections between what we are seeing and what we already know about our student as a whole person, and ask the student what they’re experiencing as well. This will open up communication by demonstrating respect for the student and asking questions instead of jumping to conclusions.
Imagine having this resource out on your desk during class, picking it up when you’re struggling with what you think might be defiant behavior and considering all the possibilities. Put it up as a poster, and share with your students that you’re trying something new or adding to your toolbox.
You’re all learning together, and no one is on the “other side” of anything in the classroom, so why not make it clear to both yourself and your students?
Create a classroom environment that is a safe, supportive space for your students.

Planning for the school year as a new teacher can be overwhelming under the best of circumstances, let alone during the third year of pandemic learning. Many teachers are returning to their classrooms for the first time in over a year, and for early-career teachers, this presents unique challenges. New teachers, particularly those who completed their student teaching in entirely virtual settings, may not know what to expect as we move back into in-person spaces. The added uncertainty of quarantine protocols and potential returns to virtual learning may make this first year seem even more daunting.
Though it may feel intimidating, we believe that it is still possible to plan for success as we continue to navigate unprecedented times. With these realities in mind, we can help you plan for an effective and meaningful first year of teaching.
Arranging the physical space
In the fall, many first-year teachers are stepping into physical classrooms for the first time. While virtual classrooms present their own unique pedagogical challenges, the return to in-person spaces may be a challenge for many students and teachers alike. Breakout rooms and chat boxes have radically changed how we conceptualize discussion, collaboration, and class participation. What do these look like in our physical classroom? Though we may be relieved to see our students in person again, we can’t just mute all mics when faced with a rowdy classroom, as tempting as it may be. In our physical classrooms, the arrangement of the space can significantly shape our culture of classroom discussion. We have a ton of options when it comes to arranging the space — rows, small groups, pairs, horseshoes, etc. — and each arrangement comes with pros and cons. Rows may seem too regimented and teacher-centered, but groups may become chatty and difficult to manage. While I love a good horseshoe configuration, I’ve been in classrooms where the physical size of the space makes them a challenge, if not an impossibility. As we move back into physical spaces this fall, you may also be contending with the challenge of creating seating charts and arranging desks to maximize instruction, while also adhering to COVID-19 safety protocols. As much as we may wish to place our students in small groups, this may be a challenge given social distancing requirements. Even if we’re in the same physical space, we may need to fall back on remote discussion strategies in order to remain safe. In all cases, it’s important to have a plan, but be flexible. Remember to let the space work with you and your lesson, not against it. In my own classroom, my students learned to expect new seating arrangements depending on different instructional goals. When we were focused on Socratic discussion, they might walk in to find the desks in a horseshoe. When they collaborated on inquiry projects, they could be found in small groups. They might be partnered for writing workshops, or they might be in rows for standardized testing. (Over the years, I became very quick at rearranging desks between classes and my students came to expect the unexpected.) When it comes to arranging the physical space, find a plan that works for you and your students!
Building classroom culture
Even after years of teaching, I’m always nervous to meet my students for the first time. The first several days sometimes feels like a revolving door of new faces, and as an introvert, it can be exhausting. I want to make sure I remember my students’ names, interests, and quirks — a daunting task when rosters contain hundreds of students. Yet, forming these personal connections lays the foundation for building a strong community of scholars. As Courtney Brown, Director of the New Teacher Network, shared in her article on classroom culture, “creating a positive classroom climate is key to a productive school year.” Taking steps to establish a positive classroom culture ensures that you’re building your school year on solid ground. Check out some of the activities below, which can help spark ideas for how you might approach getting to know your students: Student Surveys Invite students to share information about themselves via surveys using Google Forms and/or other software. Surveys can be a great way of collecting a variety of data, including gauging your students’ prior experience and level of comfort within your content area. Letter Writing Write a letter introducing yourself to your students. Then, invite students to write their own introductory letters in response, giving them the opportunity to share what’s important to them, what they’d like you to know, and what a successful school year might look like in their eyes. Interviews Students get to know each other by producing Humans of New York-inspired narratives. After sharing age-appropriate models from the Humans of New York database, you can invite students to interview each other and create a digital Humans of Our Classroom showcase using Google Slides. This will encourage students to move beyond facts about their classmates and find interesting stories to write up and share with the whole group. Memoir & Poetry Writing Invite students to explore their identities with creative writing. Consider 6-Word Memoirs and Themed Poetry Collections as ways to introduce mentor texts and writing protocols while simultaneously getting to know your students. Goal Setting Encourage a growth mindset by inviting students to set SMART goals for the upcoming school year. For an artistic take on goal setting, you might invite students to create vision boards to help them visualize the end in mind.
Engage authentically
While we hope one or more of these culture-building activities has sparked your interest, it’s also important to remember to engage authentically with your students. Make sure that your classroom culture reflects your personality as a teacher. What works well for your team leader down the hall might not necessarily work for you, and that’s okay! As G. Faith Little writes:
Ultimately, though each of our classrooms might look a little bit different from the outside looking in, positive classroom environments tend to share certain qualities. When I close my eyes and imagine this classroom environment, I see a space that is warm and welcoming, a space where my students feel safe expressing their authentic selves. I also see a space where high expectations are maintained for all students through differentiation. The ideal classroom is warm, yet appropriately challenging, and it’s important to set these expectations up front, particularly after a year of virtual learning, when many students may have felt particularly isolated and disengaged from school.
Establishing classroom structures
After more than a year of virtual learning, returning to in-person classroom routines may be difficult for many students. It’s important to establish and maintain consistent classroom structures and routines that work across in-person spaces and virtual platforms, while also factoring in possible quarantines and temporary returns to virtual learning. Here are a few things you might want to consider as you plan for the school year: Plan for Student Behavior Have a plan to proactively respond to student behavior, and use our Understanding Off-Task Behaviors resource as a guide. There are four types of behavior that have a negative impact on the classroom environment — it’s important to be able to recognize what each type of behavior looks like, as well the motivations behind it, so we can act proactively as opposed to simply reacting. Plan for Material Management Make sure you have a plan for managing the materials in your classroom. How will students turn in their work? Will student work be entirely digitized via Google Classroom or another online learning platform? If students are receiving printed materials, how will these be stored and submitted? Having a plan for how materials move through your classroom will save you a headache when it comes to the end of the marking period. Plan for Curriculum Some of our classroom structures are linked to our curriculum and planning. Check out a sample curriculum planning template — according to Courtney Brown, “these templates help new teachers thoughtfully organize and plan their curriculum while examining classroom rituals and routines, assessment strategies, and more!”
Though this is just the beginning of everything you may want to consider as you plan for the new school year, try not to overwhelm yourself by overplanning or becoming too cemented into a particular routine. My mentor always liked to remind me to be prepared to modify and adjust, a lesson that I’ve taken to heart in the years since. This year, like the last, will likely demand a great deal of flexibility and ingenuity, so be prepared to modify and adjust, but most importantly, be prepared to give yourself grace!
If you’re interested in learning more about planning with successful instruction in mind, check out our upcoming online course, Designing Coherent Instruction. This professional opportunity is intended to support new teachers in strengthening their instructional core, increasing strategic planning skills, and ensuring that lesson objectives align with instructional methods and assessments. Within each module, we’ll delve into the key competencies of the Danielson Framework, examine the key look fors, and offer promising practices and practical strategies that can be implemented in-person and online. 
Three ways we can minimize conflicts and maximize positive learning opportunities for students.

What do you do?
I’m a teacher. Oh wow, I could never do that! [long pause] It must be so rewarding, though. I’ve had this conversation at least a hundred times, maybe more. There’s the same rhythm of awkward pauses each time, where the other person looks to say something positive, and I recall small, not-so-rewarding incidents that have happened over my teaching career. Yes, I do find my work in education, both in and out of the classroom, to be extremely rewarding when I focus on the big picture. But on a day-to-day basis, teaching can be a struggle. It’s a struggle because, contrary to popular belief, teachers do not teach Math or Science, or History — they teach students. From tiny to tall, students are actual human beings with independent identities, personal autonomy, and a will of their own. The concept of “controlling your class” is both inaccurate and impossible. On any given day, a highly effective teacher can facilitate, guide, support, foster, and nurture a positive learning environment — but we can never control it. Subsequently, creating classroom culture or managing student behaviors is a major stressor for teachers at all levels. Many teachers maintain the myth of classroom control and as a result, they may struggle to embrace student-centered instructional strategies like peer-to-peer discussions, group work, and student choice on tasks. The more fear we have, the more likely we are to become hyper-vigilant micro-managers in the classroom, which can sometimes magnify small issues and escalate conflicts, creating disruptive and potentially dangerous power dynamics that can block off relationships and erode trust between teachers and students. None of which feels rewarding, I promise. As teachers, we have a lot of power and responsibility to set the tone in our own classrooms and create a culture of learning that empowers students to engage in the lessons with respect for themselves and others. Here are three ways we can de-escalate conflicts and maximize positive learning opportunities for students.
Don't take it personally
The first thing we want to remember is that all of our students are actual human beings who typically live 23 hrs and 10 minutes a day without us. When they enter into our classroom after a bad morning, feeling hungry, distracted, or any number of other emotions, it’s easy for us to take their words and actions as a personal attack. This can put us on defense, or worse — on the offense. Before reacting, we will benefit from asking a few simple questions that will help us to strategize our next steps.
Praise publicly
Even in the smallest classes, teachers are outnumbered. As a result, we’re hyper-focused on distracting, disruptive, disrespectful, and defiant behaviors and we’re far more likely to address everything that’s going wrong, rather than what’s actually going right. Often, we’re addressing negative classroom behaviors in front of the whole class because it’s more efficient to say, “Brian, stop talking” from the front of the room than it is to walk to the back of the class and talk with Brian privately in the middle of a lesson. But culture is shaped primarily by the narrative, and as teachers, we have the privileged opportunity to set up a positive narrative in our space. By eliminating public criticism, and praising publicly instead, we have the power to create positive momentum, spotlight all the students who are doing the “right” thing, and set clear expectations for what students are supposed to do.
Reflect & redirect
Our goal is not to become afraid of addressing students’ negative behaviors directly, but rather to begin addressing them strategically. If we can remove our personal feelings from the situation, we’ll be better positioned to find a method for motivating students to fully commit to a proactive and positive learning environment. Part of that methodology is public praise — the other part is personalized reflection and redirection. Especially when working in a culture that is vastly different from one’s own, focusing on short, private conversations when it’s necessary to address a negative behavior can only have a positive impact on the culture.
Our classroom spaces will feel physically and psychologically safer when we acknowledge that students’ behavior is a form of communication, even when directed towards us. When we allow ourselves to be personally offended, we are likely to simplify the situation and vilify the student. This leaves us more likely to respond defensively, criticize, and engage in power struggles. Each of these instincts are likely to increase tension and escalate conflicts at the exact moment when we know that diffusing the situation would be more beneficial to our students and ourselves.
Strengthening your communication with students and families can seem daunting. How can you get started?

“The importance of good parent-teacher relationships has been well documented. Research has shown that parent involvement in education benefits not only the child but also the parents and teachers.”
We want our students, parents, and teachers to experience these benefits.
Challenges are easy to list, and we likely have a long list beyond these, but here are some of the big ones.
Start by planning
Strengthening your communication with students and families can start as simply as organizing your approach. Whether you’re approaching the beginning of the year, a new term, or are in the middle of a course, trying a new tool that can be customized to your unique communication style and your school’s expectations for family contact will support your work.
Communication goals
In the example below, our first goal was to start with listening, in this case using a baseline survey to the student’s parents that establishes a connection and supports us in understanding our student from the parent’s perspective. Our second goal was to have three positive contacts with the family, in addition to any contacts necessary to discuss issues that may arise in the classroom. From here, we would continue to add our notes and check in on communication that may be needed in order to meet our goals. This template can continue to be streamlined or expanded as practices change over time. While the content of parent/teacher conversations may not always be easy, simply getting started can give you confidence and increase the ways in which you can connect with families. 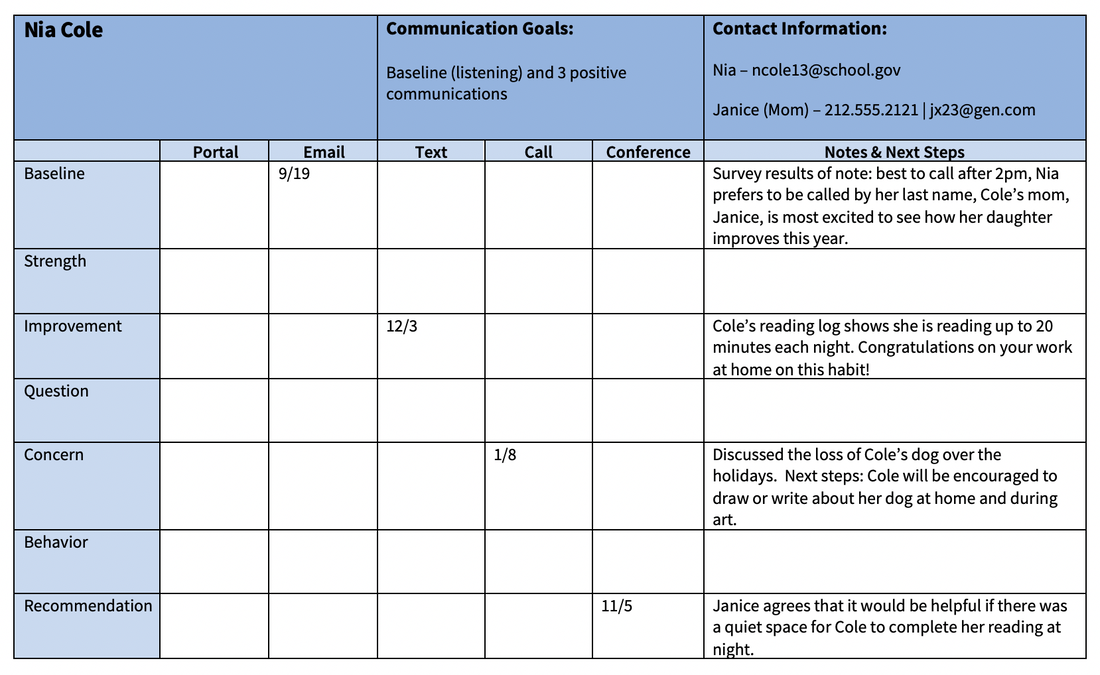
Exit tickets allow you to breathe for a couple of minutes before your next class period starts.

An exit ticket is like an Instant Pot. You hear about how great it is — it saves time, it’s simple, it’s flexible, and it doesn’t need many ingredients. It seems to be a staple tool at this point, so you pick one up and start using it. So it goes with exit tickets. When we start using them, it may be because of both convenience and necessity. They’re quick and easy, and they allow you to breathe for a couple of minutes before your next class period starts or you need to switch over to the next subject you’re teaching.
Exit tickets also provide a supportive rhythm to your class. They signal to kids that they will be transitioning soon, and this is invaluable to many students — especially if they struggle with change during their school day. Exit tickets provide a natural way to move from one space into the next, figuratively (if students stay in the same classroom) and literally (if students move to a new room). Sometimes that’s as far as we get with using exit tickets. It feels like enough, especially at the start of the school year or in the first year of your teaching career. But we can improve our use of exit tickets by taking them from simple (and valuable!) classroom tools and morphing them into invaluable formative assessments. “The power of exit tickets lies not only in informing instructional decisions — it includes the public acknowledgment of students' ideas and making adaptations of lessons, based on these responses, transparent to students (Marshall 2018). Importantly, exit tickets can also give voice to students who are otherwise silent in class, including English language learners and students "on the margins" of classroom life, and can draw your attention to who is being served in which ways, giving you critical information for shaping your practice to enhance equity and inclusivity.”
What is an exit ticket?
Backing up for a minute, let’s define an exit ticket. An exit ticket is a task that typically requires a short response from students. Teachers use exit tickets after an activity or learning period, and it can literally be the ticket to exit the room at the end of a period or a way for students to exit a part of the lesson. Exit tickets are not graded. Because they are not associated with a grade, students take on very little risk and can be honest about what they do and don’t understand, and may be more likely to ask questions they wouldn’t on a graded piece of writing.
Using exit tickets as formative assessments
Exit tickets can be used in any subject area at any grade level as formative assessments to provide teachers with authentic data, in real time. “To be effective, an exit ticket should have specific prompts for students and take only about five minutes to complete. Students can record their responses on index cards, sticky notes, notebook paper, or online (e.g., Google Forms, Padlet, Schoology, etc.). Ideally, student responses inform the next stages of learning by highlighting whether teachers should clarify ideas, reteach them, extend them, offer practice, introduce new ideas, or restructure future instructional activities (Marshall 2018).”
Making exit tickets your own means designing (or using templates) for short responses that you can read fairly quickly. This can be as simple as a sticky note on which students respond to a prompt with a few words or a What, So What, Now What chart.
At the end of a day, class period, or activity, you can engage in a quick cycle of inquiry with the data. 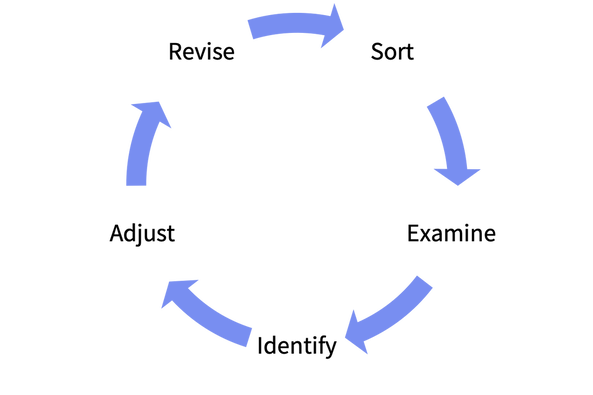
1. Sort the data based on your own criteria from the lesson or for your specific students.
2. Examine each set of data. What do you notice? What needs attention?
3. Identify areas that need to be taught, retaught, or further investigated.
4. Adjust your next lesson to accommodate your findings.
5. Revise your next exit ticket (if needed) if you see that your prompt isn’t yielding useful data.
Using exit tickets as formative assessments is a promising practice that can be quick and can also support deep and differentiated learning in your classroom. Share with us your exit ticket practice below. Similar to Instant Pots, when you learn new ways to use them, it’s fun to share your findings with others!
Make the most of your time and energy by using a batching strategy for your planning.

By the time you’ve cultivated a course curriculum, it’s easy to run out of steam as you move into building a unit plan, the detailed guide that will support your lesson planning. One way to make the most of your time and energy is to plan using a batching strategy. We can think of this like grocery shopping for the week.
If I walk down the aisles (online or in real life), filling my basket with ingredients for Monday (breakfast, lunch, dinner) then Tuesday (breakfast, lunch, dinner) and so on, the trip will take a while. If I shop by meal type, like breakfasts, lunches, and dinners, I cut down on the time and effort I spend. Of course, it’s even faster when I identify ingredients that can be used for more than one meal type. I pick up eggs to scramble for my breakfast sandwich and hard boil for my evening salads. I grab apples to go in my lunch box and morning smoothie. Like grocery shopping, when we identify areas in our unit plan that we can create or gather in batches, we cut down on the time we need to design that part of our plan. For instance, if we want to include transition tools for teachers to use in their lesson planning, we could develop our list in a batch starting with our own ideas and incorporating others:
Batch your transitions depending on what you and your students need in the classroom — is it about needing time? Do you want students to read, write, or talk to one another, or should they quietly move from one activity to the next? Do your transitions depend on whether students are individually working or in groups? Batch them in a way that works best for you, and drop the transitions you’ve collected into the batch that makes most sense: 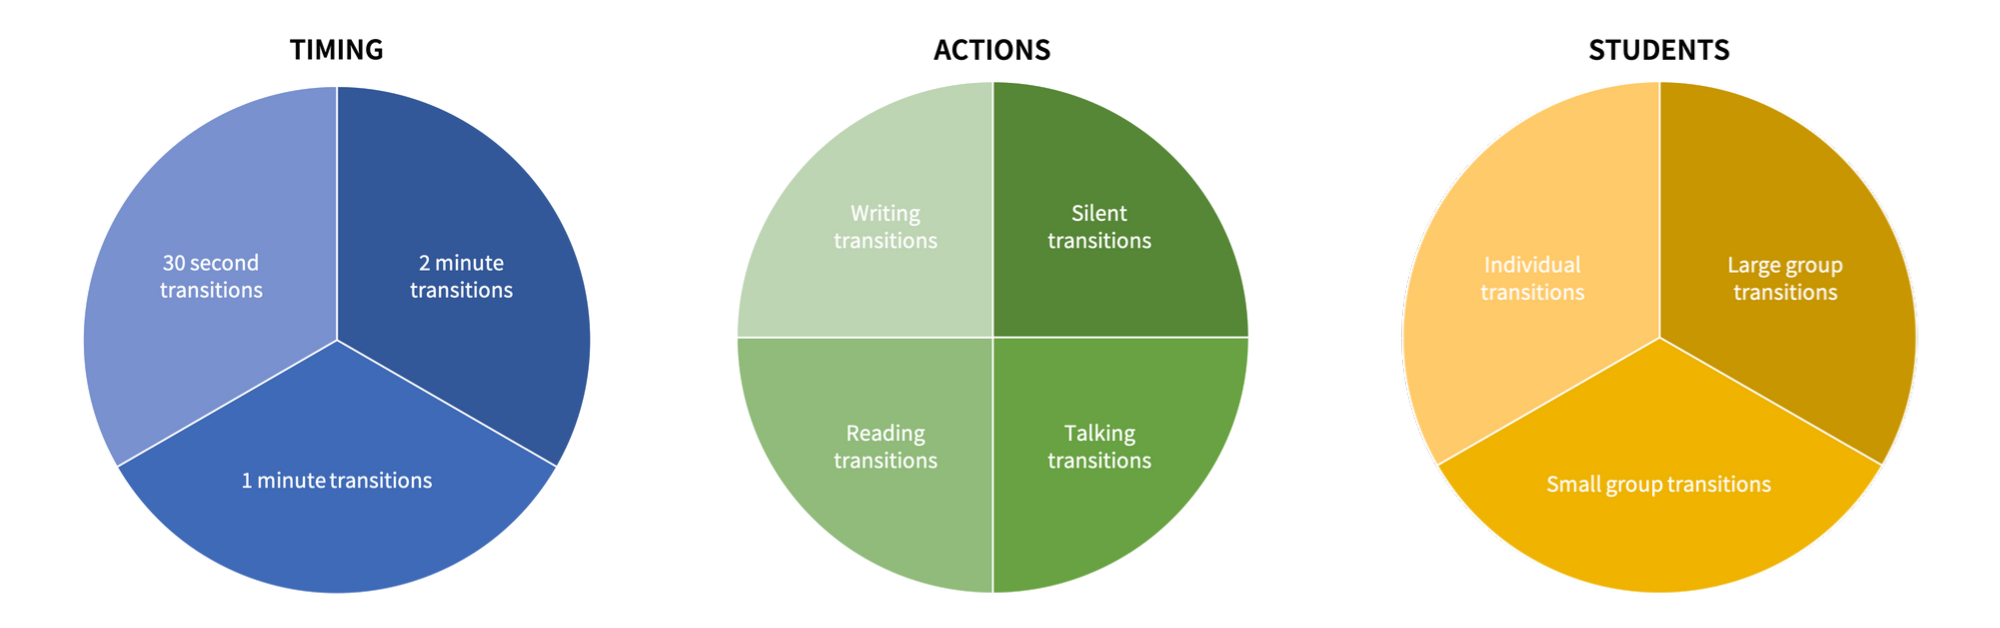
One you have your lists together, it’s simple to drop transition tools, one at a time, into logical places in each unit plan. Even quicker, and possibly more empowering for other teachers, is to turn the list into a menu of options teachers can use to find what works best for their teaching style, content area, and students.
Here’s a menu we developed for educators at Jewish Home Lifecare who were teaching students how to provide services that support health, individuality, and dignity to elders. This menu allowed novice teachers to review a number of options and find transitions that were a match for their teaching style and their students for that session. Even the simplest of menus can be a good jumping off point for generating new ideas!
Whiteboard agenda
Writing out a simple agenda is helpful for easing transitions — it makes it clear where we are and what's to come. Write agenda on the whiteboard (sample below):
Check items off the list as you complete each activity/task so students know where they are in the plan for the day. Invite a student to read off what’s next as you go through the day and/or to reiterate what they’ve already accomplished. Bonus tip: Have a very chatty/active student? Make them Agenda Leader for the day. They should help you stay on schedule by recounting what has been done and reading what should happen next.
Time to learn!
Play this as a little game that will result in a call & response. The more you practice this, the more the students will come to experience it as a cue to look up and engage. It takes a bit of time, so be bold and power through until this becomes a ritual.
This also works to get them back on their current task if they get distracted. Play around with ways to use this method, modifying it to fit what works for you and your students.
Organizing student groups
One of the hardest transitions to make is moving from individual work to group work. An effective way to guide grouping is to use post-it notes with a number or a letter, colored paper, or even playing cards. Using one of these items helps students organize themselves in their groups all at once, rather than calling out every student's name individually or having students wander around the room "looking" for a group.
Two-minute timer
Two minutes before one activity ends and another begins, make announcements about how much time is left and what students will be doing next (including what they need to have to move forward). Examples:
Deep breath
You're ready to move on to the next instruction! |
ARTICLES BY TOPICARTICLES BY AUTHOR


|


|
|
The Center for Professional Education of Teachers (CPET) at Teachers College, Columbia University is committed to making excellent and equitable education accessible worldwide. CPET unites theory and practice to promote transformational change. We design innovative projects, cultivate sustainable partnerships, and conduct research through direct and online services to youth and educators. Grounded in adult learning theories, our six core principles structure our customized approach and expand the capacities of educators around the world.
|
ABOUT US
525 West 120th Street, Box 182 New York, NY 10027 416 Zankel Ph: (212) 678-3161 cpet@tc.edu Our Team Career Opportunities |
RESOURCES
Professional Articles Ready-to-Use Resources Teaching Today Podcast Upcoming PD Opportunities |
COACHING SERVICES
Custom Coaching Global Learning Alliance Literacy Unbound New Teacher Network Student Press Initiative |